Three weeks ago, I decided to start running. Without my daily commute and general walking from building to building at the college, my body was craving movement. I tried some Youtube aerobics (remember Billy Blanks and Tae Bo) and just got angry at the lack of space in my house and the complicated footwork. I decided to venture outside for a “ten minute blast” around the neighborhood. “I can handle ten minutes,” I thought, but my first timed round was excruciating.
Week one of running was just silly and hard, mostly because my body was in shock, but also because I just tried to run without stretching or looking into training. I thought, “I’ll just run around the block for a few ten-minute chunks to help with energy and stamina.” Ahhhh, wilderness! Thankfully I got connected with Jill Whisonant (photo below), a mentor at Summerville’s Fleet Feet, and she’s helped me set goals to safely begin running. Now I look forward to my morning runs without dread; I can honestly say they help a lot right now.
Two years back, Jill began taking her running more seriously and joined Fleet Feet’s 10K program to get more involved with runners locally. “[Fleet Feet is] a great resource no matter what your running experience,” explains Whisonant. “They just create a fun environment where people grow in the art of running and staying safe.”
Over social distancing, Jill gave me a pep-talk and to-do list about how to safely start running. Here’s what she had to say:
2) The thing that scares most people off [from running] is their breath. Initially, it’s not inherently easy to control your breath when your heart feels like it is beating out of your chest, so you have to find the pace that allows you to keep moving forward. And sometimes, that’s walking before you build up to the run.
3) If you start running without a plan, chances are you will get frustrated and quit. Take some time to understand where you are, and find the path that will get you to where you want to go. A great way to start is with intervals. This will help you find that comfortable pace I was referred to earlier. Start with a 5-minute run/ 5-minute walk. If that’s too easy, increase your run time and decrease your walk time until you find what challenges you Try 6/4, 7/3 or even 8/2. Once you find that interval that is challenging but doable, start to increase the run time and decrease the walk time weekly. Start tracking distance. Run a mile, walk 5 minutes, run a half mile, walk 5 minutes, etc. Start with 30-minute blocks and go from there. You’ll eventually find that you hit a comfortable pace/stride and can go for miles and miles and miles.
5) Do some big holding stretches when you’re done running – that’s when you’ll need to keep those muscles loose so they don’t tighten up on you as they cool down.
6) Depending on when you run will depend on how and when you eat. Everyone is different and this is one of those things you may have to learn about yourself the hard way. For runs that will be 45 minutes or longer, a light breakfast like a smoothie, some oatmeal or even a couple of eggs – nothing too much – should be enough to keep you going but not make you feel heavy.
7) Staying hydrated will become part of your daily norm…it’s something you need to pay attention to all day, not just when you are running. Your body NEEDS water and when you start running, it needs it more. Set a timer on your phone so you remember to drink every hour. Pay attention to the color of your urine…it should be a pale yellow. That means you are well hydrated. Plan on bringing something to help you stay hydrated on runs lasting longer than an hour. You will need to replenish what your body is sweating out.
8) I think it’s important to note that not everyone loves running and that’s ok too. Find something that you enjoy doing, so that you are able to keep yourself accountable to the activity. It doesn’t matter how far or fast anyone else goes. This is your journey, measure your progress and cheer for your wins! For some people, running comes naturally, for others, like me, it doesn’t. I was lucky enough to find a tribe of people that encouraged me every step of the way, but it took me a l-o-n-g time to understand your level of dedication is what will determine your final outcomes.
In response to everyone going online, Akindi (our bubble sheet scanning application) has created new features that allow you do use the program in your online class. This option is great for quizzes, tests, and exams that are time consuming to recreate online such as those with music notes, math formulas, etc.
NOTE: Akindi does not offer all of the anti-cheating features available in OAKS.
When I met George Ducker on the steps of St. Phillip’s Dorm (now referred to as Berry Hall), he told me that one day he would be a paid writer and “the doctor of rock-n-roll.” Fast-forward to present-day, Ducker, who spent his first (and only) year at CofC back in 1998 (I call that a “Quarter-Grad”), is now living the writing dream. In addition to that PhD in rock that he is still working on, Ducker is one of the writers for “Exeter,” an increasingly popular podcast that has now spanned two full seasons. Set in rural South Carolina, the cast includes Kevin Robertson (’99), Robert Seay (’99), and David Thomas Jenkins (’02), all friends he met at the CofC School of the Arts. (George Ducker – image below)
According to Phoebe Lett of the New York Times, “If you love a ‘Law & Order’ marathon and binged ‘True Detective’ in one go, ‘Exeter’ might be your new favorite podcast. This police procedural follows Colleen Clayton (Jeanne Tripplehorn of ‘Criminal Minds’), a tough-as-nails homicide detective whose trust in her own judgment is shattered after a woman she convicted of murder 10 years earlier is exonerated. Bad timing for an existential crisis, since a ritualistic serial killer is terrorizing her home of Exeter County, S.C.”
I first listened to “Exeter” on a road trip. I’m a huge fan of murder mysteries, and this podcast made the majority of my 10-hour drive from Charleston, SC to Louisville, KY melt away — it’s really that good. And sure, I’m biased because my dear friend co-wrote it and actors I know and love are in it, but that’s an even bigger reason to listen. Listening to “Exeter” not only made me proud, but it took me back to my theatre days here at the college when we all sat on those second floor Simons Center couches dreaming up big creations and exciting futures. Our theatre professors gave us the tools, spaces, and freedom to create, and those comforting walls of the Emmett Robinson and Theatre 220’s blackbox space birthed playwrights, actors, directors, and designers that continue to work in “the biz” today. I imagine a lot of today’s theatre students are feeling unmoored, mourning their disconnection to those theatre spaces and classmates that every CofC grad holds so dearly in their hearts. Having worked with some of these instructors to transition to online learning environments, I know that they are rising to the challenges that Covid19 is presenting and working hard to continue the connection with their students. Thank goodness for the tech that is enabling these students to see and interact with their instructors and friends. And thank goodness for the arts and the people creating the stories we find ourselves disappearing into as we maintain our social distance. (Seay and Jenkins – images below)
In an article for the LA Times, Jeanne Tripplehorn recalls “recording ‘Exeter’ in what she called a ‘black box in Burbank,’ the cast used microphone packs instead of staying behind a desk, which she says added more life to her performance. ‘It was very modern, it felt very fresh,’ she said. ‘If we did a scene where we were sitting in a car, we would stand up and get out of the car. Or if we fell, we’d actually fall,’ she said. ‘I think it will help the listener to really lift it off the page so to speak.’”
Screens can be exhausting, especially now that we seem to be in front of them most of the day. If you want to give your eyes a break and get lost in a story (and feel some CofC pride in the process), give “Exeter” a listen. Not only can you access it (in most places) for free, but there are now two seasons available.
Find it onSundance Now, Podchaser, Spotify, Audible, Apple… Pretty much anywhere you find podcasts.According to Audible Feast’s Best Podcast Series of 2018, “there is also additional content available to Sundance Now subscribers, called ‘dynamic captioning, a process by which visual elements are added to underscore emotion and enhance the tension of this gripping crime mystery.’” *Youtube (free) andAmazon (with a Sundance Now trial period) also stream this dynamic captioning content.
Contact your friendly TLT team member if you have problems finding or listening to this or other podcasts!
As you’ve probably figured out by now, online discussions are not the same as discussions in your face-to-face class. They don’t happen as organically and do require a bit of planning and work to be successful. Below are two guides to help you, and your students, be more successful in this arena.
The Quizzes tool enables you to create and manage points-measured assessments. Create and manage quiz questions from the Question Library or the Quizzes tool, and organize quizzes into categories to make it easier to find assessments with similar or related content. This tool can be used to deliver quizzes, tests and final exams.
Use the quiz preview option to test the accuracy of content and grading before you release a quiz. In a preview, you can answer the questions, view allowed hints, submit the quiz, auto-grade answers, read feedback, and view report results.
Go to Grades > Quizzes
From the dropdown arrow next to the quiz, choose Preview
From Grades > Quizzes, click the dropdown menu next to the quiz and choose Grade
Click on Attempt 1under a student’s name
Go through and read and assess the questions that need to be manually graded
When evaluating a quiz submission, click Save Draft to store any grading and feedback information
When finished, click Publish Feedback to release the feedback to the Grade book and the student
Note: Once feedback is published, the user interface displays options to Update and Retract. Retract allows score and feedback to be hidden from learners. Published feedback automatically appears in your grade book. If you retract published feedback, the entry is simultaneously removed from the grade book until you publish again.
On the Manage Quizzes page, from the dropdown menu next to the quiz with attempts you want to reset, click Grade.
Select the check box for each attempt you want to reset and then click the Reset icon at the top of the list of quiz attempts.
Note: By default, the Grade Quiz page only displays completed quiz attempts. To view quiz attempts in progress, on the Users tab or the Attempts tab, from the Restrictto filter, select either All attempts or Users with attempts in progress.
You can view an event log of a single quiz attempt made by an individual learner.
In the Quizzes tool, open a quiz.
From the quiz drop-down menu, select Grade.
On the Grade Quiz page, in the user list, click attempt 1.
Export the event log of all quiz attempts
You can export an event log of all quiz attempts made by all learners in your course.
Open the quiz that you want to export the event log for.
On the Grade Quiz page, click Export Event Logs.
Enter a name for the file.
Specify where you want to save the file.
Click Save.
View Quizzes Attempt Logs
The Attempt Logs track detailed quiz attempt events per user. From the Overview tab you can view quiz attempts based on Quiz Entry time, Quiz Completion time, Quiz Attempt Deleted, and Quiz Attempt Restored.
From the Detailed tab you can view the following quiz attempt events: Quiz Entry and re-entry times, Response Save time, Page Movement time, Quiz confirmation screen / completion time, and IP Address when each event occurs.
On the navbar, click Grades >Quizzes.
On the Manage Quizzes page, from the dropdown menu next to the quiz with attempts you want to see, click Attempt Logs.
Click the Overview tab or the Detailed tab to view all Attempt events for the quiz.
With the College operating online, I know it’s difficult for some discipline whose work isn’t easy to do online, for example Math and Drawing. If the assignment you wish to give is better suited to the student handwriting or hand-drawing something then just have them scan it! This is also a great option for faculty who have semester long notebooks or portfolios that are turned in.
A FREE app that students can use (and you for that matter) is Adobe Scan. Adobe Scan works on phones and tables and makes it so easy for users to take pictures of multiple items and have one PDF created.
Check out the Adobe Scan page to download the app and here’s a tutorial for you and your students on how to use the app:
Are you ever looking for an easy way way to create visually interesting content, newsletters, or presentations? If so, you might be interested in Adobe Spark. It’s also great for personal stories, to make professional looking graphics, and even to make short videos.
There are tons of premade templates to help you get started but you can also start from a blank slate. What I also like is that it gives you access to free photos, your Dropbox, Google Drive and Google Photos.
Once you create the item, you can link to it or embed it in OAKS, a blog, a webpage, etc. It’s fast and easy with a very low learning curve.
Here are a few samples to help you understand what it can do:
I just learned that PowerPoint now has the capability to create live (real-time) captions for your audience members who may need them. When you’re presenting, you can turn on the captions and Microsoft automatically transcribes what you are saying. While it’s not 100% perfect, it’s pretty good and can be a real help to individuals in your audience/class that need captions.
Microsoft PowerPoint version 16.22.127.0 or higher
Set up captions and subtitles
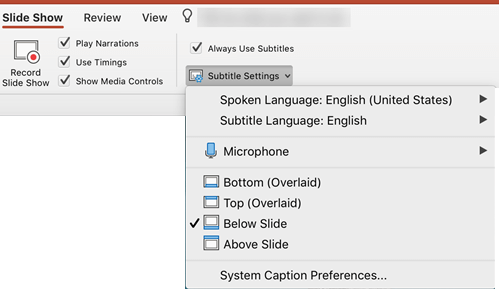
You can choose which language you want to speak while presenting, and which language the caption/subtitle text should be shown in (i.e. if you want it to be translated). You can select the specific microphone you want to be used (if there is more than one microphone connected to your device), the position where the subtitles appear on the screen (bottom or top, and overlaid or separate from slide), and other display options.
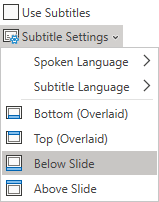
On the Slide Show ribbon tab, select Subtitle Settings.
Use Spoken Language to see the voice languages that PowerPoint can recognize, and select the one you want. This is the language that you will be speaking while presenting. (By default, this will be set to the language corresponding to your Office language.)
Use Subtitle Language to see which languages PowerPoint can display on-screen as captions or subtitles, and select the one you want. This is the language of the text that will be shown to your audience. By default, this will be the same language as your Spoken Language, but it can be a different language, meaning that translation will occur.
In the Subtitle Settings menu, set the desired position of the captions or subtitles. They can appear over the top or bottom margin of the slide (overlaid), or they can appear above the top or below the bottom of the slide (docked). The default setting is Below Slide.
More appearance settings are available by clicking Subtitle Settings > System Caption Preferences.
You can change the color, size, transparency, and font style of the subtitles. You can change the background to improve contrast and make text easier to read.
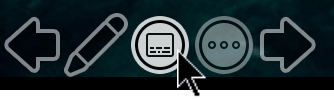
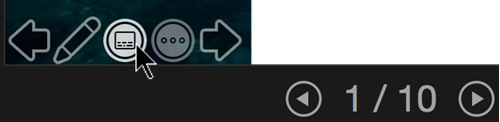
Turn the feature on or off while presenting
If you’re in the middle of giving a presentation and want to turn the feature on or off, click the Toggle Subtitles button from Slide Show View or Presenter View, on the toolbar below the main slide:
In Slide Show View:
In Presenter View:
Tips
If you see problems in the captions or subtitles, try speaking more deliberately.
Try to avoid or eliminate background noise that may interfere with your voice.
Captions & Subtitles depends on a cloud-based speech service, so it’s important to have an internet connection that’s fast and reliable.
Microsoft PowerPoint version 16.0.11601.20178 or higher
Set up captions and subtitles
You can choose which language you want to speak while presenting, and which language the caption/subtitle text should be shown in (i.e. if you want it to be translated). You can select the specific microphone you want to be used (if there is more than one microphone connected to your device), the position where the subtitles appear on the screen (bottom or top, and overlaid or separate from slide), and other display options.
On the Slide Show ribbon tab, select Subtitle Settings. Or, you can adjust the settings without leaving your presentation through the context menu, Slide Show or Presenter View menus > Subtitle Settings > More Settings.
Use Spoken Language to see the voice languages that PowerPoint can recognize, and select the one you want. This is the language that you will be speaking while presenting. (By default, this will be set to the language corresponding to your Office editing language.)
Use Subtitle Language to see which languages PowerPoint can display on-screen as captions or subtitles, and select the one you want. This is the language of the text that will be shown to your audience. By default, this will be the same language as your Spoken Language, but it can be a different language, meaning that translation will occur.
In the Subtitle Settings menu, set the desired position of the captions or subtitles. They can appear over the top or bottom margin of the slide (overlaid), or they can appear above the top or below the bottom of the slide (docked). The default setting is Below Slide.
More appearance settings are available by clicking Subtitle Settings > More Settings (Windows).
You can change the color, size, transparency, and font style of the subtitles. You can change the background to improve contrast and make text easier to read.
Turn the feature on or off while presenting
If you’re in the middle of giving a presentation and want to turn the feature on or off, click the Toggle Subtitles button from Slide Show View or Presenter View, on the toolbar below the main slide:
In Slide Show View:
In Presenter View:
You can also toggle subtitles from the right-click menu, or with the shortcut key J.
To have subtitles always start up when a Slide Show presentation starts, from the ribbon you can navigate to Slide Show > Always Use Subtitles to turn this feature on for all presentations. (By default, it’s off.) Then, in Slide Show and Presenter View, a live transcription of your words will appear on-screen.
Tips
If you see problems in the captions or subtitles, try speaking more deliberately.
Try to avoid or eliminate background noise that may interfere with your voice.
Captions & Subtitles depends on a cloud-based speech service, so it’s important to have an internet connection that’s fast and reliable.
Microsoft Edge, Google Chrome 34+, Mozilla Firefox 25+Microsoft Edge, Google Chrome 34+, Firefox 25+
Set up captions and subtitles
You can choose which language you want to speak while presenting, and which language the caption/subtitle text should be shown in (i.e., if you want it to be translated). You can also select whether subtitles appear at the top or bottom of the screen.
Simplified Ribbon:
Classic Ribbon:
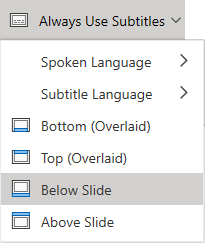
(Simplifed Ribbon) On the Slide Show ribbon tab, select the drop-down arrow next to Always Use Subtitles to open the menu of options.
(Classic Ribbon) On the View ribbon tab, select Use Subtitles. Then click Subtitle Settings to open the menu of options.
Use Spoken Language to see the voice languages that PowerPoint can recognize, and select the one you want. This is the language that you will be speaking while presenting. (By default, this will be set to the language corresponding to locale of your web-browser.)
Use Subtitle Language to see which languages PowerPoint can display on-screen as captions or subtitles, and select the one you want. This is the language of the text that will be shown to your audience. (By default, this will be the same language as your Spoken Language, but it can be a different language, meaning that translation will occur.)
Set the desired position of the captions or subtitles: they can appear overlaid at the top or bottom margin of the slide. The default setting is Bottom (Overlaid).
Turn the feature on or off while presenting
To have subtitles always start up when a Slide Show is presented, select View > Always Use Subtitles.
If you’re in the middle of giving a presentation and want to turn the feature on or off, click the Use Subtitles button in Slide Show, on the toolbar below the main slide:
On/Off keyboard shortcut: J
Tips
If you see problems in the captions or subtitles, try speaking more deliberately.
Try to avoid or eliminate background noise that may interfere with your voice.
Captions & Subtitles depends on a cloud-based speech service, so it’s important to have an internet connection that’s fast and reliable.


 .
.